
Repairing Subfloor in Atlanta Homes: Structural Solutions, Not Quick Patches
Key Takeaways
Heide Contracting treats repairing subfloor as a structural safety issue—not a cosmetic patch—especially in older Atlanta homes built between 1920 and 1980, including ranches, bungalows, and historic properties across intown neighborhoods.
Soft, sagging, or bouncy floors usually signal deeper problems in floor joists, beams, or foundations. A damaged subfloor is often the symptom, not the root cause.
Our process starts with root-cause investigation before any plywood is cut. We inspect crawl spaces and basements, map moisture levels, and analyze load paths to understand what’s really happening beneath your feet.
We use engineered, steel-enabled solutions including sistered joists, LVLs, steel beams, and proper posts with concrete footings to restore long-term structural strength and prepare your home for future renovations.
We reject vague promises and quick fixes. When other contractors say “it’s normal settling” or “too complex,” we provide clear answers with closed-scope, itemized quotes.
Atlanta homeowners can schedule a free consultation with Heide Contracting to get a structural assessment and a transparent plan for lasting repair.
When Subfloor Problems Mean More Than Just “Bad Plywood”
You notice a soft spot near the dishwasher in your 1960s Decatur kitchen. The bathroom floor next to your original cast-iron tub in a 1940s Atlanta bungalow sags slightly when you step off the bathmat. Tile grout keeps cracking in your 1970s Sandy Springs ranch no matter how many times you fill it. Doors that closed perfectly for twenty years suddenly rub against their frames.
These aren’t random annoyances. They’re your house talking to you.
Warning signs that point to structural issues, not just surface wear:
Bouncy or spongy floors that flex underfoot
Musty or damp smells rising from the crawl space
Visible dips or slopes between walls
Recurring grout cracks in tile, especially in bathrooms and kitchens
Floors that slope noticeably toward an exterior wall or corner
Doors and windows that suddenly stick or won’t latch
In older Atlanta homes with crawl spaces and partially finished basements, these symptoms typically trace back to long-term moisture damage, poorly spanned joists, cut or notched framing from past plumbing work, or settling piers—not just a bad panel of damaged plywood.
The worry is understandable. You might search online for a simple DIY solution, possibly thinking you can just replace one layer of plywood and move on. But those quick patch jobs can hide ongoing movement while leaving rotted joists, undersized framing, or foundation problems untouched beneath the surface.
At Heide Contracting, we treat subfloor repair as an opportunity to correct the entire load path—from finish flooring down to soil. This approach protects your family’s safety and preserves your options for future remodeling, whether that’s a kitchen expansion, open-concept layout, or finished basement.

A worker is inspecting the wooden floor joists in a residential crawl space, using a flashlight to assess the condition of the subfloor and identify any damaged plywood that may need repair. The inspection is crucial for ensuring the integrity of the whole floor before any installation of new flooring or plywood patches.
Step 1: Diagnose the Problem Behind the Damaged Subfloor
Our first step on any subfloor repair in Atlanta isn’t grabbing a circular saw—it’s conducting a structured inspection. Once plywood is cut, your options narrow significantly. We prefer to understand the whole floor system before removing anything.
How we map joists and beams:
We identify joist direction from nail patterns visible on the existing floor surface, pull targeted sections of flooring when necessary, and inspect from below via the crawl space or basement whenever access allows. This gives us a complete picture of the framing layout before any demolition begins.
Checking for moisture and rot:
Atlanta’s Piedmont clay soils hold water, and crawl space humidity often exceeds 70% RH—well above the 50% threshold where wood rot begins. We check for darkened or crumbly plywood, probe joists around bathrooms, kitchens, and laundry rooms with moisture meters, and look carefully at areas with histories of long-term leaks: old shower pans, cast-iron drain connections, and water heater locations.
Evaluating structural alignment:
We sight along joists and beams to identify sagging, check whether previous owners cut joists for plumbing or HVAC runs (a common violation of load-bearing requirements), and look for undersized or poorly supported spans that are surprisingly common in mid-century renovations and additions.
For complex cases—like a 1920s Grant Park home with multiple additions over the decades—we may consult a structural engineer to confirm load paths, beam sizing, and connection details before defining the repair scope. This step prevents expensive surprises mid-project.
What you get from our assessment:
Our findings drive a written, closed-scope plan. We specify exactly what gets repaired: subfloor panels, joists, beams, footings. You won’t see vague language like “shore up floor as needed” in our quotes.
Step 2: Safe Removal of Damaged Subfloor Panels
Careful demolition protects wiring, plumbing, and historic finishes below—especially important in older Atlanta homes where electrical has been retrofitted multiple times and copper or PEX lines run in unexpected locations. basement conversions
Measuring and preparing:
We measure subfloor thickness to set saw depth correctly. Post-1960 homes typically have 5/8” or 3/4” plywood or OSB. Pre-1940 homes often have 1x plank subfloor that requires different handling. Setting the circular saw to the exact depth of the wood prevents cutting into utilities or nicking the tops of joists. You should use a circular saw set to slightly more than the thickness of the subfloor for cutting.
Marking cut lines strategically:
Using a chalk line, we mark cut lines just inside joist centers—similar to advice you’ll find in DIY guides. But we choose cut locations strategically to work with our structural repair plan, not just for convenience. Sometimes the most accessible cut isn’t the smartest one for long-term support.
Controlled cutting and removal:
Circular saws handle straight runs across the room
Oscillating tools work near walls, cabinets, and tubs where precision matters
Pry bars lift panels without splitting adjacent, salvageable plywood
We remove all visibly compromised wood—delaminated plywood, areas with active mold, sections where screws no longer grip—rather than leaving “almost okay” zones that will fail within a few years
For localized water damage or soft spots, complete removal of the entire subfloor panel is often unnecessary; only the missing or damaged sections may need to be addressed. Competitors also discuss methods for repairing missing or damaged sections in plywood subfloors prior to hardwood flooring installation, emphasizing the importance of achieving a flat, smooth surface and exploring various filling materials and techniques, such as thinset, modified thinset, and liquid fillers, to ensure proper subfloor preparation for high-quality flooring results.
Documenting surprises:
Any discoveries during removal—hidden termite galleries, unstrapped plumbing, or unprotected wiring running through joist hole openings—get documented and integrated into the updated repair scope and quote. No job exists in a vacuum.
Step 3: Repairing and Reinforcing the Structure Beneath the Subfloor
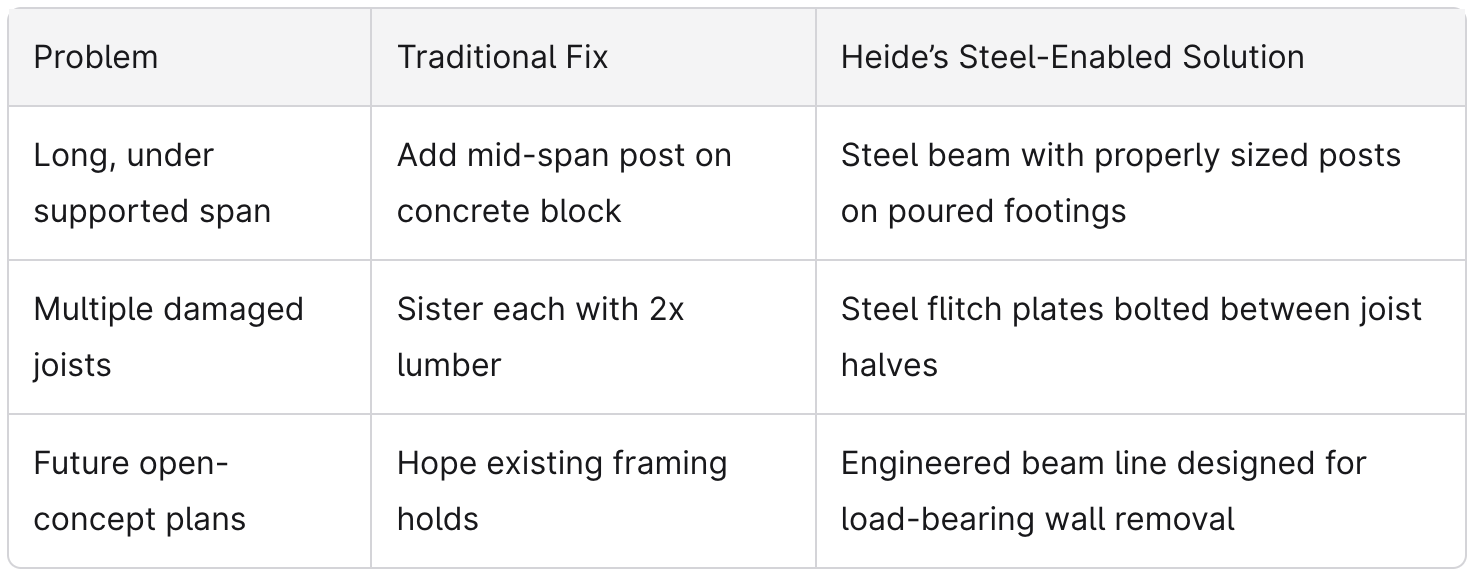
This is where Heide Contracting diverges sharply from typical “subfloor repair” contractors. We treat this step as structural rehabilitation, not just adding a few 2x4 blocks and calling it done.
Sistering joists properly:
When joists are damaged beyond simple patching, we sister them using full-depth lumber or engineered LVLs. These are glued with construction adhesive and secured with bolts or structural screws to the existing joist, extending well past the damaged area. Both ends must bear on solid support—otherwise you’re just transferring the problem to another location. For issues related to unstable foundations or when solid support is compromised, foundation repair by experienced professionals may be necessary.
If you are replacing a damaged section of subfloor, you can sister a support board to the exposed joist to support the new piece of plywood. Sistering a support board to the joists can help support the new plywood during repairs, ensuring the new piece is properly secured and the floor remains flat and strong.
Standard plywood sistering (doubling a joist with construction adhesive and 10d nails) boosts moment capacity by roughly 80-100%, but it can corrode in humid crawl spaces over time. Our approach often includes steel-enabled solutions that deliver full design strength restoration.
Adding blocking and “dead wood”:
We install solid blocking or bridging between joists to spread concentrated loads. This matters especially under tubs, kitchen islands, and laundry machines—anywhere weight concentrates in one spot. Proper blocking also stiffens floors enough to support tile or stone finishes without the deflection that leads to cracked grout.
Steel solutions for complex situations:
Foundation and pier corrections:
We replace failing wood shims with proper masonry, upgrade stacked block piers to continuous footings where needed, and tie new supports into the existing foundation system. This attention to the underside of the structure is what separates structural repair from cosmetic patching.
Planning ahead:
We coordinate all this with your current and future plans. Reinforcing a kitchen floor now means that large island or heavy stone counters you install in 2027 won’t cause sagging or cracking later.
Step 4: Installing the New Subfloor for Long-Term Performance
Once the framing is corrected, we treat the new subfloor as a structural diaphragm—an integral part of the load-bearing system—not just a surface to nail finish flooring into.
Material selection:
We match or upgrade materials based on your home’s needs. Most 1980-present homes get 3/4” tongue-and-groove subfloor-rated plywood or OSB. For earlier homes with existing plank subfloor, we carefully detail new plywood installation to work with the original structure.
When choosing between plywood and OSB, we consider your plans. OSB handles moisture differently than plywood—critical information if you’re planning a bathroom renovation or have a history of crawl space humidity issues. We also acclimate new plywood or OSB to the room’s temperature and humidity for 48–72 hours before installation to help prevent post-repair warping.
Layout considerations:
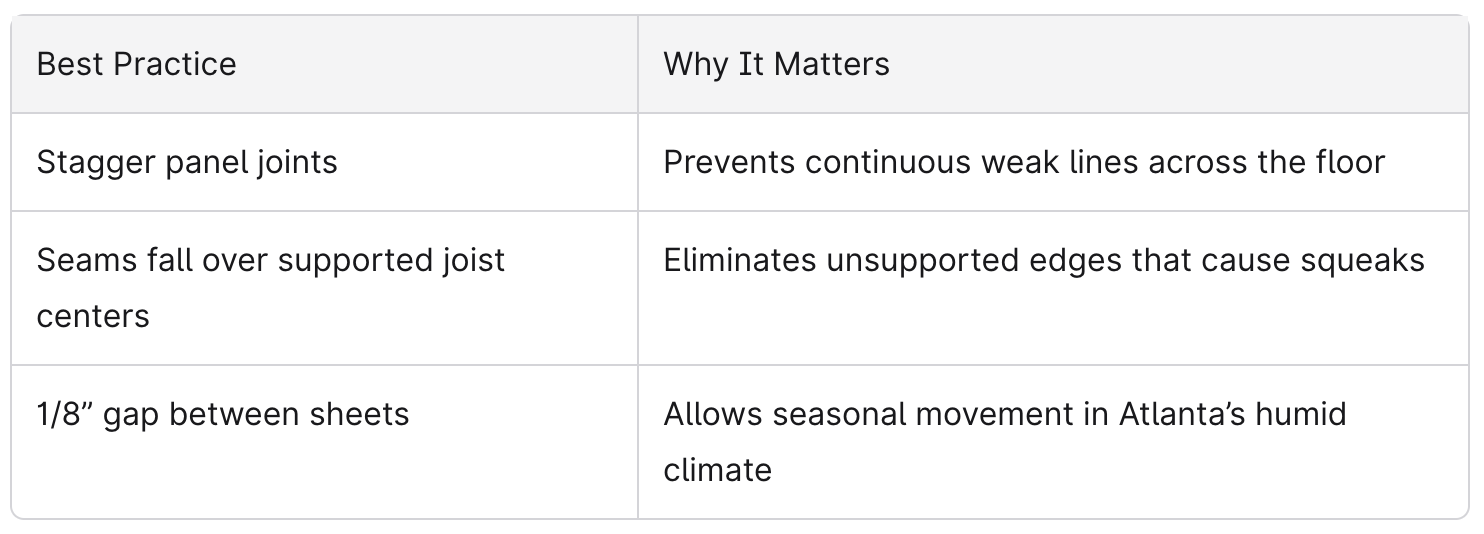
When laying out panels, we ensure the edge of each plywood panel is properly supported and securely fastened to prevent flexing or squeaking. New subfloor panels are cut to fit snugly, leaving a 1/8" gap for expansion. We also install new plywood or OSB with the curve of the sheet facing up to prevent compression.
Fastening for performance:
Construction adhesive goes on joist tops before panels are set, and we also apply glue between the plywood and subfloor for added stability. We fasten with approved screws or ring-shank nails in specified patterns—fasteners are spaced every 6-8 inches along the edges and every 12 inches in the field when fastening plywood. You should secure the new piece of plywood with nails every 6 inches. Pre-drilling holes is important to prevent splitting when fastening plywood. We use a hammer to drive nails when securing the new subfloor panels. This combination reduces squeaks dramatically compared to nails alone and increases overall floor stiffness. Squeaks in a subfloor are typically caused by wood rubbing against loose nails or the movement of panels against joists.
Using the right method here matters more than most homeowners realize. Bolted or screwed connections achieve significantly higher shear strength than nailed plywood, which helps reduce squeaks and prevents future loosening.
Meeting code and manufacturer requirements:
We follow local code and manufacturer guidance on fastener type, spacing, and panel orientation. This ensures your subfloor materials and floor system are ready for tile, hardwood, or luxury vinyl without excessive deflection.
Final preparation:
Before finish flooring goes down, we check flatness with straightedges. When needed, we use appropriate leveling compounds—not drywall mud or generic floor patch—to correct minor variations. We sand the plywood surface before applying fillers or patches to ensure a smooth, flat surface. The worst areas of damage or unevenness are addressed first before finish flooring installation. Self-leveling compounds can be used to create a smooth, even surface before installing finish flooring. Minor dips are addressed using a self-leveling compound, while high spots can be ground down with a floor grinder or sander. The surface needs to be right before you spend money on new flooring.
Special Considerations: Bathrooms, Kitchens, and Basements
Water-prone and high-load areas are where Atlanta homeowners most often discover subfloor issues. These spaces demand stricter standards than a typical bedroom.
Bathroom Subfloor Repair
Bathrooms present unique challenges in older homes:
Reinforcement under tubs and showers: Cast-iron tubs filled with water can weigh 500+ pounds. We add blocking and sometimes sistered joists to handle concentrated loads.
Proper underlayment: Cement backer or suitable tile underlayment over correctly installed subfloor prevents moisture penetration.
Waterproofing integration: We coordinate subfloor repair with waterproofing systems to prevent repeat rot issues—the same problem that brought you to us in the first place.
Kitchen Subfloor Repair
Kitchens in older Atlanta homes have often been remodeled multiple times since the 1970s, with plumbing and electrical added in layers:
Island and countertop planning: We plan for current or future islands and stone countertops that concentrate significant weight
Coordinating with trades: Subfloor repair often exposes outdated plumbing or electrical that should be addressed before the floor closes back up
Appliance loads: Refrigerators, ranges, and dishwashers create point loads that need proper support beneath
Basement and Crawl Space Conversions
For many Atlanta homeowners, subfloor repair ties into larger projects:
Basement lowering: When we lower a basement floor for additional headroom, the entire first-floor framing system gets evaluated and upgraded
Crawl space conversions: Converting a crawl space to conditioned, usable space requires structural assessment of the floor above
Integrated engineering: Heide Contracting can combine subfloor and foundation adjustments in a single, engineered plan
By addressing subfloor strength now, you unlock reliable future renovations: open-concept living areas, new additions above existing spaces, and finished basements that won’t develop soft spots or cracks within a few years.
Preserving Historic Character While Strengthening the Structure
If you own a 1920-1960 Atlanta home in Grant Park, Virginia-Highland, Druid Hills, East Lake, or similar neighborhoods, you understand the tension between modern performance and original charm. You don’t want to gut your home to fix it.
Our approach to historic homes:
We keep visible historic elements—original trim profiles, door thresholds, tongue-and-groove hardwood floors—while upgrading the hidden structural layers beneath. Joists, beams, and subfloor panels can be reinforced or replaced to meet or exceed current standards without touching the finishes you love.
Protecting what matters during repair:
We carefully protect original hardwood, plaster, and millwork during work
We plan access routes to disturb as little historic fabric as possible
We phase work to minimize time with floors open and exposed
Enabling future projects:
Reinforcing subfloors and framing now often enables future structural expansions: dormer additions, finished attics, or second-story additions that would be too risky on a compromised original floor system.
Heide Contracting specializes in this balance. We preserve exterior and interior character while quietly rebuilding the structural systems underneath to support another 50+ years of use. Your house can look like 1928 on the outside and perform like 2025 where it counts.

The image showcases beautifully restored hardwood flooring in a vintage Atlanta bungalow, featuring original trim and crown molding that highlight the home's classic charm. The flooring appears well-maintained, reflecting a successful home improvement project that likely involved addressing issues with the subfloor and using construction adhesive for a secure finish.
How Heide Contracting Handles Quotes, Scope, and Homeowner Communication
Many homeowners call us after getting vague quotes from other contractors—something like “repair subfloor as needed, $X” with no explanation of what actually gets fixed or how long it will last. That’s not how we work.
Free consultations and closed-scope quotes:
We provide free consultations and closed-scope, itemized quotes. Each line describes a specific structural action.
Visual documentation:
We walk homeowners through our findings with photos from crawl spaces and basements. You can see the joists, beams, and subfloor conditions yourself instead of just taking our word for it. When we say there’s rot at a joist bearing, you’ll see the rot.
Scheduling and disruption management:
We phase work to keep key areas—like one bathroom or the kitchen—functional when possible. Work zones get sealed off to limit dust spread throughout your house. We understand you’re living in your home, not camping.
Clear communication throughout: For more insights on effective communication and home improvement, visit our blog.
Our goal is clarity and confidence. You’ll know what’s being fixed, why it’s necessary, and how it supports your future renovation plans. No surprises, no vague language, no “we’ll see what we find” as the entire scope.
If you’re looking for more answers about your specific situation, we’re happy to talk through options during your consultation.
FAQ: Subfloor Repair in Atlanta Homes
These frequently asked questions address concerns we hear that go beyond what’s covered above, with answers specific to the types of homes and conditions common around Atlanta.
How do I know if my subfloor problem is serious enough to call a structural contractor instead of just a handyman?
A single, localized squeak might be minor—sometimes a few screws can secure a loose panel and solve it. But persistent soft spots, noticeable dips between rooms, doors going out of alignment, or recurring cracked tile all point to structural issues in joists or supports beneath the subfloor. These symptoms justify a professional structural review rather than repeated surface-level fixes that don’t address the root cause.
Can you repair just one room’s subfloor, or do you always have to redo the whole house?
We routinely perform isolated repairs—a 5’ x 8’ bathroom zone or a single kitchen bay, for example. However, we always evaluate how that room interacts with the rest of the structure. If adjacent areas share the same underlying problem (like joist damage extending beyond a single room), we’ll advise you honestly rather than create a repair that looks good in one spot while problems continue next door.
Will I need to move out while you repair the subfloor?
For most projects, families can stay in the home. We isolate work zones, protect pathways, and plan around daily routines. Very large or multi-room structural repairs may temporarily limit access to certain areas—you might not be able to use a specific bathroom for a few days—but complete displacement is rarely necessary.
How long does a typical structural subfloor repair take in an older Atlanta home?
Expect 2-5 days for a single bathroom or kitchen zone, including framing reinforcement and new subfloor installation. More complex projects involving beam replacement, steel posts, or crawl space conversions take one to several weeks. We’ll give you a realistic timeline during your consultation based on what we find during inspection.
What’s the next step if I’m worried about my floors right now?
Contact Heide Contracting for a free consultation. We’ll inspect the affected area, review crawl space or basement conditions, explain what we find in plain language, and provide a closed-scope, itemized quote. From there, you can make an informed decision with real information instead of guesswork.
When you’re ready to stop accepting vague answers and start getting real solutions, Heide Contracting is here. We’re the contractor Atlanta families turn to when others say the problem is “normal,” “too complex,” or “impossible.” Schedule your free consultation today to get a closed-scope quote and a clear plan for lasting structural repair.